


This post may contain affiliate links. As an Amazon associate, Google associate as well as associate for other programs, Guitar & Music Institute may earn commissions from qualifying purchases.
 Have you ever dreamed of building your own guitar? Well, now you can with this in-depth article that will provide you with all the information and inspiration you need to create your very own custom playing machine. Whether you’re an experienced builder or a beginner, this comprehensive guide will take you through the step-by-step process of building a guitar from scratch, giving you the knowledge and resources to craft a personalized instrument that matches your style and preferences. It’s also important to maintain your new instrument and ensure it stays in top condition.
Key Takeaways:
- Learn how to build your own guitar with this detailed step-by-step guide.
- Discover essential tools, parts, and suppliers for your guitar building project.
- Design and plan your guitar according to your preferences and style.
- Master the techniques of routing, shaping, and carving the body and neck.
- Install electronics, bridge, and nut for optimal functionality and playability.
Step 1: Tools, Parts, and Suppliers
Before you embark on your guitar building journey, it’s crucial to gather all the necessary tools, parts, and materials. Having the right equipment and sourcing high-quality components will ensure a smooth and successful build. Here’s a breakdown of what you’ll need:
Guitar Building Tools
To bring your guitar to life, you’ll require a set of essential tools. These tools will assist you in shaping the body, assembling the neck, and fine-tuning every detail of your instrument. Some key tools include:
- Plunge router
- Drill
- Jigsaw
- Belt sander
- Soldering iron
These tools will be invaluable throughout the construction process, helping you achieve precision and accuracy in every step. Here are links to Amazon if you need to purchase any of these tools.

SKIL Plunge and Fixed Base Router Combo
The SKIL 14 Amp Plunge and Fixed Base Router Combo, also known as the RT1322-00, is a high-quality tool that deserves recognition. With its powerful 14 Amp motor, this router combo is capable of handling even the toughest routing tasks with ease. The plunge base allows for precise and controlled cutting depths, while the fixed base ensures stability during use. Additionally, the variable speed control feature provides flexibility for different applications. Overall, the SKIL 14 Amp Plunge and Fixed Base Router Combo is an excellent choice for both professional woodworkers and DIY enthusiasts.
Speed adjustment feature
Dual-LED lights
Speed control LCD display
Easy base adjustments and bit changes
Some adjustments can be fiddly
Plunge base is a little heavy
Size: 10.04″W x 14.37″H
Motor: 14A, 2.5 HP
Base type: Fixed, Plunge
Power: 120 V
Bit type control: LCD Display
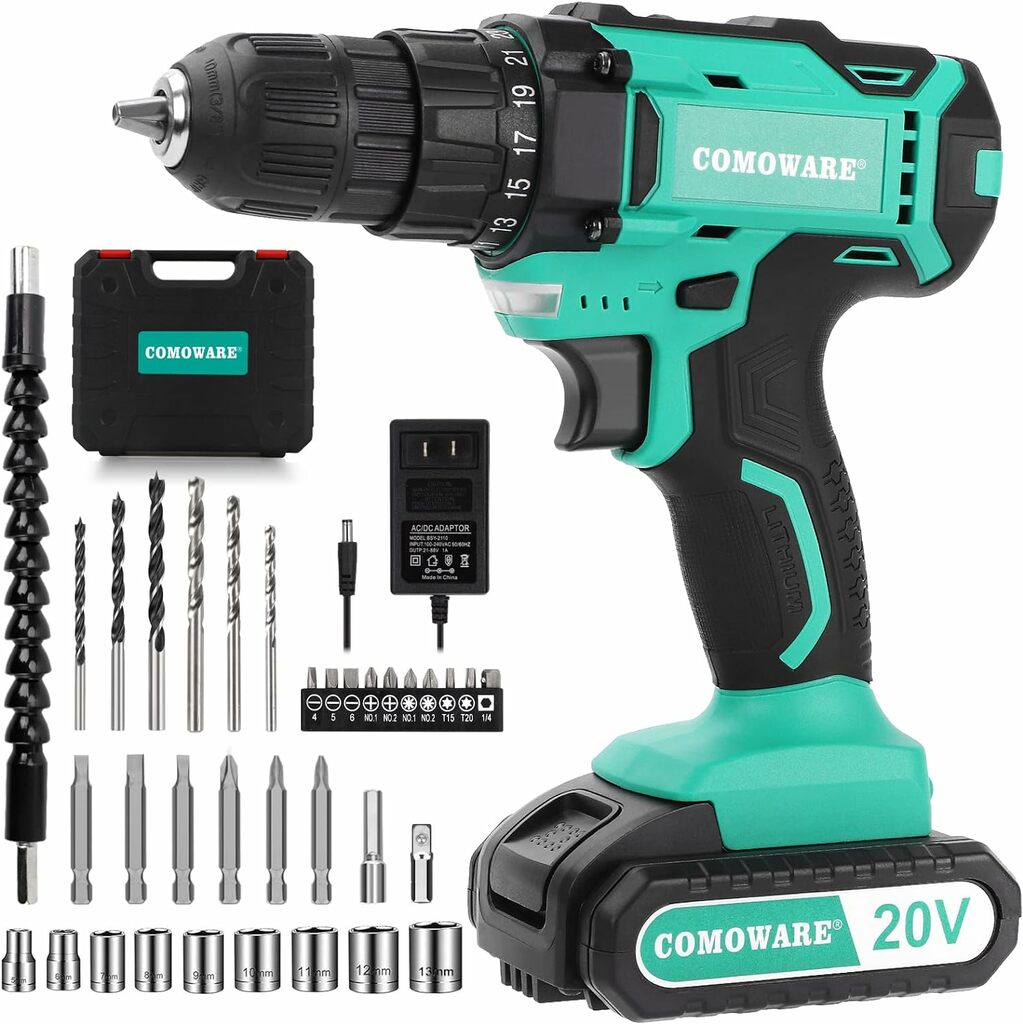
COMOWARE 20V Cordless Drill Set
The COMOWARE 20V Cordless Drill is a great addition to any tool kit. With its keyless chuck and variable speed options, it makes drilling and driving tasks a breeze. The 266 In-lb torque provides enough power to tackle any project, while the 25+1 position clutch allows for precise control. The set also includes 34 drill/driver bits, ensuring that you have the right tool for any job. Plus, with the included battery and charger, you can keep the drill powered up and ready to go. Overall, the COMOWARE 20V Cordless Drill is a reliable and versatile tool that will not disappoint.
Includes bits and bit holder
Batteries and charger included
Two speeds, 0-350 and 0-1,300
Adjustable clutch
Battery charges quickly
Chuck struggles with larger bit sizes
No belt hook or bit storage
Speed (RPM): 2 modes, 1300 max
Torque (inch pounds): 266
Chuck: 3/8” Keyless
Weight: 5.2 pounds
Design: Green
Voltage: 20V
Number of positions: 25
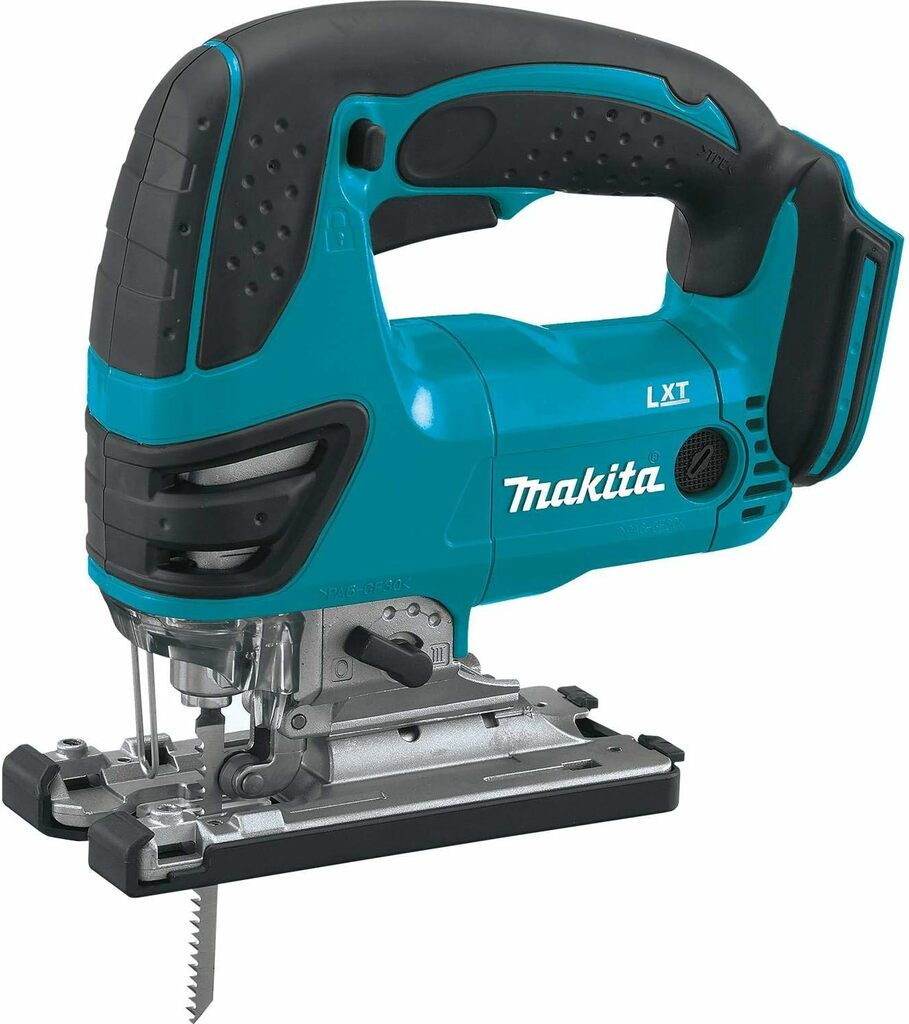
Makita Cordless Jig Saw
The Makita XVJ03Z 18V LXT® Lithium-Ion Cordless Jig Saw is a fantastic tool for any woodworker or DIY enthusiast. As a brand known for its quality and durability, Makita certainly delivers with this cordless jig saw. The tool offers impressive cutting power and precision that makes it perfect for various applications.
One notable feature of this jig saw is its lithium-ion battery, which provides long-lasting power and ensures that you won’t be interrupted by frequent battery changes. The tool is also ergonomically designed, making it comfortable to hold and use for extended periods. Additionally, the XVJ03Z offers adjustable cutting speeds and a three orbital setting for versatility.
Overall, the Makita XVJ03Z 18V LXT® Lithium-Ion Cordless Jig Saw is a reliable and efficient tool. It is an excellent addition to any workshop, with its powerful performance and durable construction. Whether you’re a professional or a DIY enthusiast, this jig saw will not disappoint.
Excellent cutting speed
Accepts both T- and U-shank blades
Efficient motor
Cordless convenience
Doesn’t come with a battery
No LED light
Voltage: 18 V
Item Weight: 6 pounds
Angle: 45°
Batteries Type: 1 Lithium Ion
Style: Bare Tool
Size: 12.3″ x 3.6″ x 9.1″
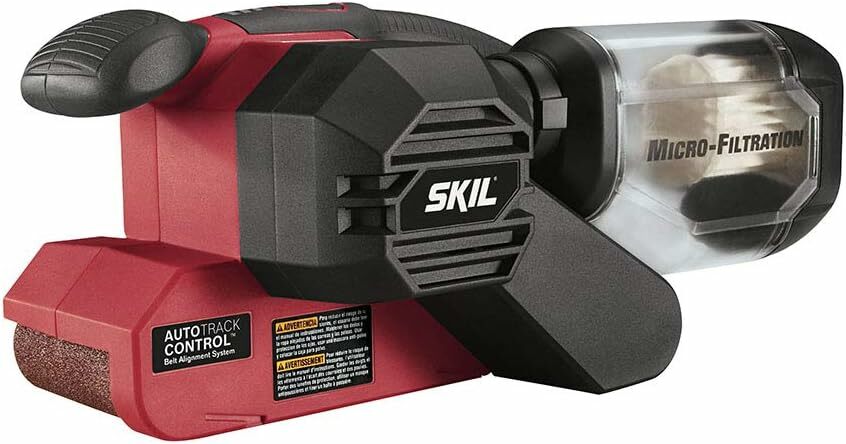
Skil Belt Sander 7510-01
The Skil 7510-01 Belt Sander is a game-changer for anyone in need of a reliable and efficient sanding tool. With its powerful 120-volt motor, this sander delivers exceptional performance and ensures smooth, professional-grade results. The 3-inch by 18-inch belt size is perfect for tackling a variety of projects, from sanding large surfaces to detailed work.
What sets the Skil 7510-01 apart from other belt sanders is its user-friendly design. The adjustable belt tracking ensures precise and consistent sanding, while the pressure control technology prevents accidental gouging. The automatic belt tensioning system further enhances convenience and durability.
Equipped with a clear dust canister, the Skil 7510-01 also keeps your work area clean and minimizes debris. Additionally, the sander’s ergonomic handle provides a comfortable grip, allowing for extended use without strain.
Overall, the Skil 7510-01 Belt Sander is a top-notch tool that delivers exceptional results. Whether you’re a professional woodworker or a DIY enthusiast, this sander is a must-have in your toolkit.
Pressure control technology
Comes with variable, 3-Way Learning Technology
Adjustable handle position for lefties
Auto track belt alignment
Only one-year warranty
Only one speed
Grit Type: Medium
Voltage: 120 V
Power: 6 A
Size: 12.25″L x 6.25″W x 5.75″H
Power Source: Corded Electric
Belt alignment: Auto track
Edge sanding: Flush
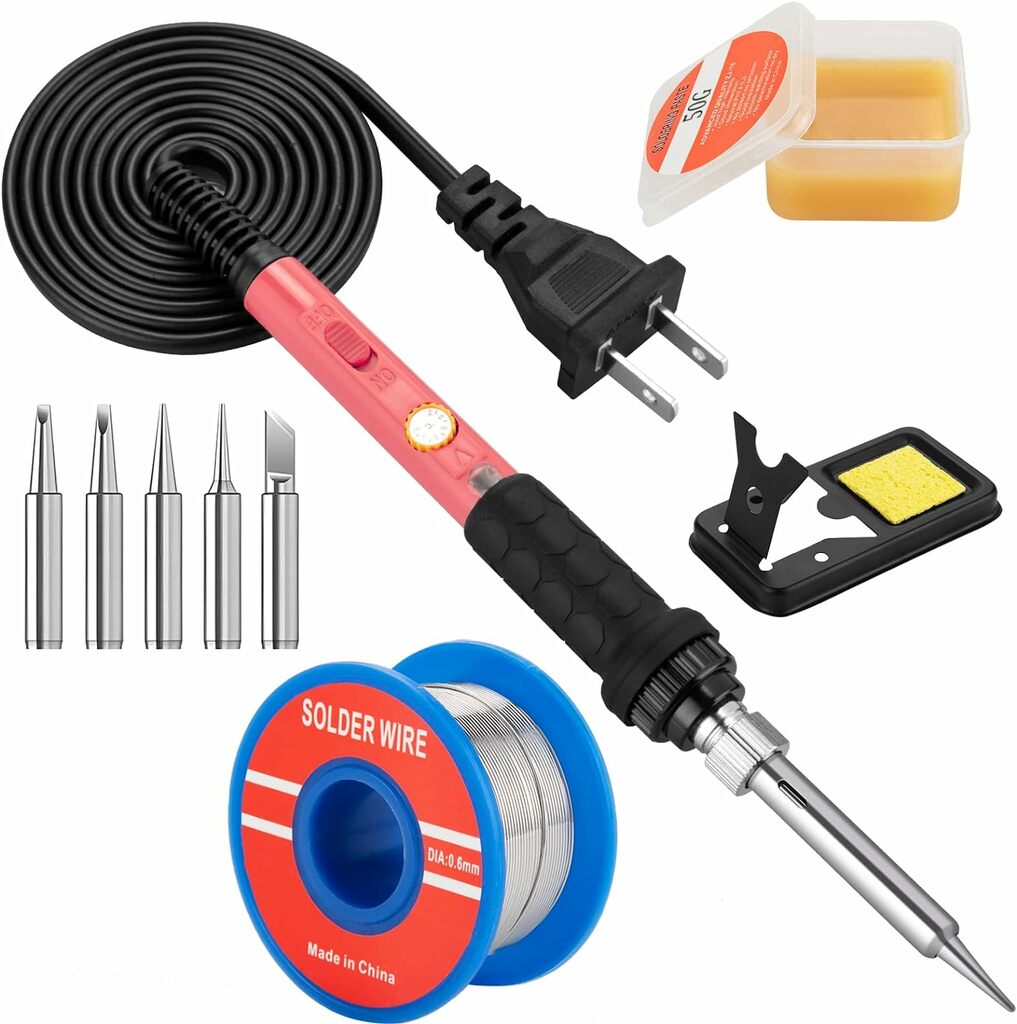
Q-MING Iron Welding Kit
The Q-MING Soldering Iron Kit is a fantastic tool for any hobby enthusiast in need of a reliable and versatile soldering iron. With its 60W power output and interchangeable iron tips, this kit is suitable for a wide range of soldering and welding tasks. The adjustable temperature feature allows for precise control, ensuring optimal results every time. The 10-in-1 kit also includes various accessories and a 110V US plug, making it incredibly convenient and user-friendly. Overall, the Q-MING Soldering Iron Kit is a must-have for anyone who values quality, durability, and functionality.
Temperature adjustable
Soldering iron heats up quickly
Only one stand position
No solder
Temperature Range: 200-450 Degrees Celsius
Voltage: 110 V
Weight: 9.1 ounces
Size: 10.43 x 5.71 x 1.97 inches
Style: 5-in-1
Usage: Hobby
Guitar Parts and Electronics
While you may opt for building certain guitar parts from scratch, it’s common to use premade components for certain elements. Here are some essential parts and electronics you’ll need:
- Premade neck
- Body blank
- Bridge
- Tuners
- Pickups
- Electronics
By choosing high-quality parts and electronics, you can ensure optimal sound quality and durability for your custom-built guitar.

Yinfente Electric Guitar Neck
This Yinfente Unfinished Electric Guitar Neck Replacement is a fantastic choice for guitar enthusiasts looking to upgrade their instrument. The 24 frets and 25.5 inch maple wood fretboard ensure that players have plenty of room to explore different styles and techniques. The binding on the fretboard adds a touch of elegance, making this neck visually appealing. The headstock is also well-crafted and provides excellent stability. Although the neck is unfinished, it allows guitarists to customize and finish it to their liking, adding a personal touch to their instrument. Overall, this Yinfente Unfinished Electric Guitar Neck Replacement is a reliable option for any musician seeking to enhance their guitar-playing experience.
Truss rod already in place
Good overall quality
Longer 25.5-inch scale length
Good headstock shape
No truss rod adjustment at the headstock
Finish needs to be applied
Proficiency Level: Professional
Size: 25.5
Strings: 6
Weight: 1.75 pounds
Material: Maple Wood
Fret: 24
Usage: Electric Guitar
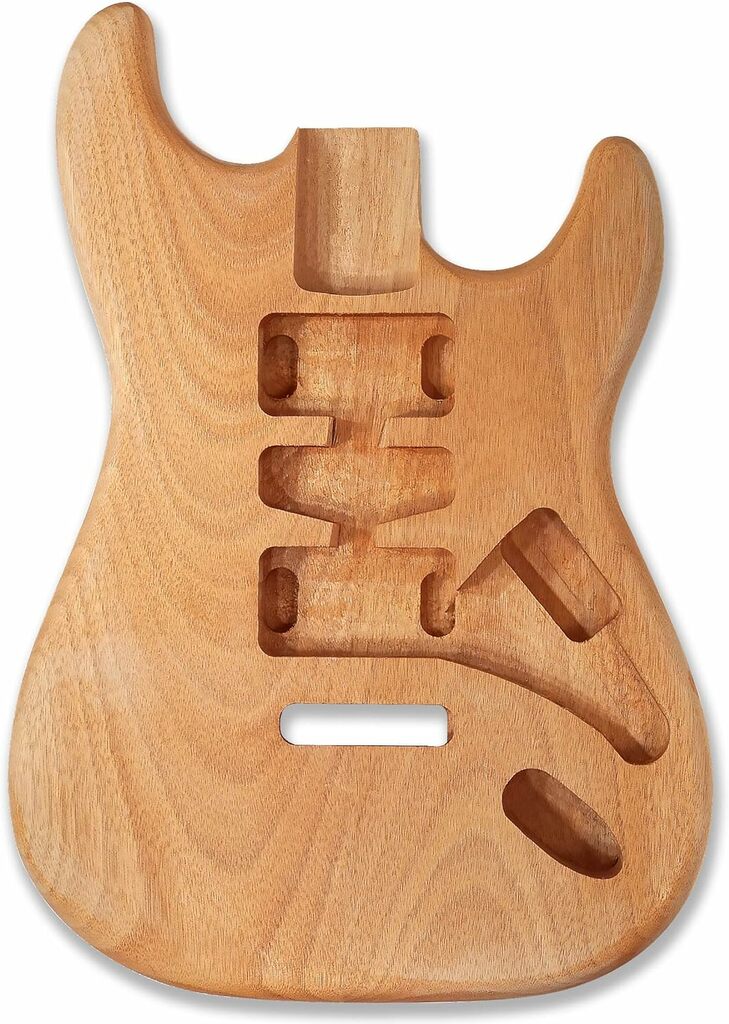
BexGears Guitar Body Okoume
The BexGears DIY Electric Guitar Body made of Okoume wood is a fantastic addition to any guitar builder’s collection. With its high-quality materials and precision craftsmanship, this body offers exceptional sound and durability. The natural beauty of the Okoume wood shines through, giving the guitar a unique and eye-catching appearance.
The DIY aspect of this product allows guitar enthusiasts to truly personalize their instrument, making it a one-of-a-kind creation. The body is easy to work with and provides a great canvas for custom paint jobs or other creative modifications. Overall, the BexGears DIY Electric Guitar Body is a must-have for guitar builders looking to create their dream instrument.
Lightweight
Open-pore finish can be applied easily
Different body sizes available
Solid wood body
Reasonable cost for the wood used, good tonal possibilities
No neck or electronics
Requires additional parts to complete
Weight: 3 pounds
Hand Orientation: Right
Size: 18″L x 12.75″W x 1.65″H
Material: Okoume Wood
String: 6
Design: DIY

Ubrand 52.5mm Guitar Bridge
The Ubrand 52.5mm Guitar Stratocaster Tremolo Bridge is a top-notch product. Designed to fit perfectly on a Stratocaster, this bridge provides exceptional functionality and stability for any guitarist. The right-handed configuration ensures easy accessibility and comfortable playing experience.
The build quality of the Ubrand bridge is impressive. Made with durable materials, this bridge is built to last and withstand the test of time. The 52.5mm spacing between the strings offers optimal string alignment and enables smooth and precise string bends.
Moreover, the tremolo feature of this bridge allows for versatile pitch modulation, making it a great choice for guitarists who love to add unique effects to their playing. Overall, the Ubrand 52.5mm Guitar Stratocaster Tremolo Bridge is an excellent product that delivers exceptional performance and value for any guitarist.
Adjustable bridge +/- 1.5mm spacing
Comes with all necessary hardware
Includes all necessary components
Adjustable string spacing, screw spacing, and saddle height
Flat mounting surface only
Some parts are made of cast metal
Weight: 3,5mm
String type: Alloy Steel
Design: Metal Body
Guitar type: Fender Stratocaster or Squier Style Electric Guitar
Bridge System: Adjustable
Surface: High gloss chrome
Block depth: 35mm
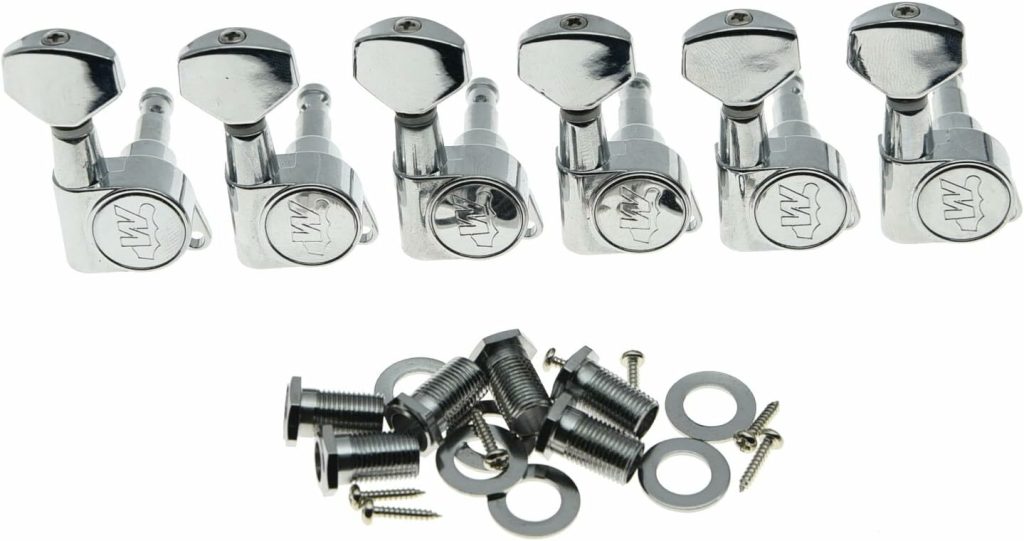
Wilkinson Guitar Tuning Pegs
The Wilkinson 6 Inline Chrome E-Z Post Guitar Tuners are a fantastic addition to any guitarist’s collection. These tuning pegs from Wilkinson provide excellent precision and stability when it comes to tuning your guitar. The chrome finish gives them a sleek and polished look that adds a touch of elegance to any guitar, whether it’s a Strat or a Tele. The “EZ Post” feature of these tuners makes it a breeze to change strings, saving you precious time and energy. Overall, the Wilkinson 6 Inline Chrome E-Z Post Guitar Tuners are a great investment for guitarists looking for reliable and stylish tuning pegs.
More stable tuning than original Fender tuners
Great tuning ratio of 19:1
Possible DIY project
E-Z post system makes restringing faster and easier
You need to drill 10mm holes for these to fit
No alternative finishes
Guitar Model: Strat and Tele
Tuner Weight: 8.2 ounces
Fitting: 45 degree fixing tag
Number of tuners: 6
Locking: No
Size: 6.14 x 2.28 x 1.61 inches
Tuning Ratio: 19:1
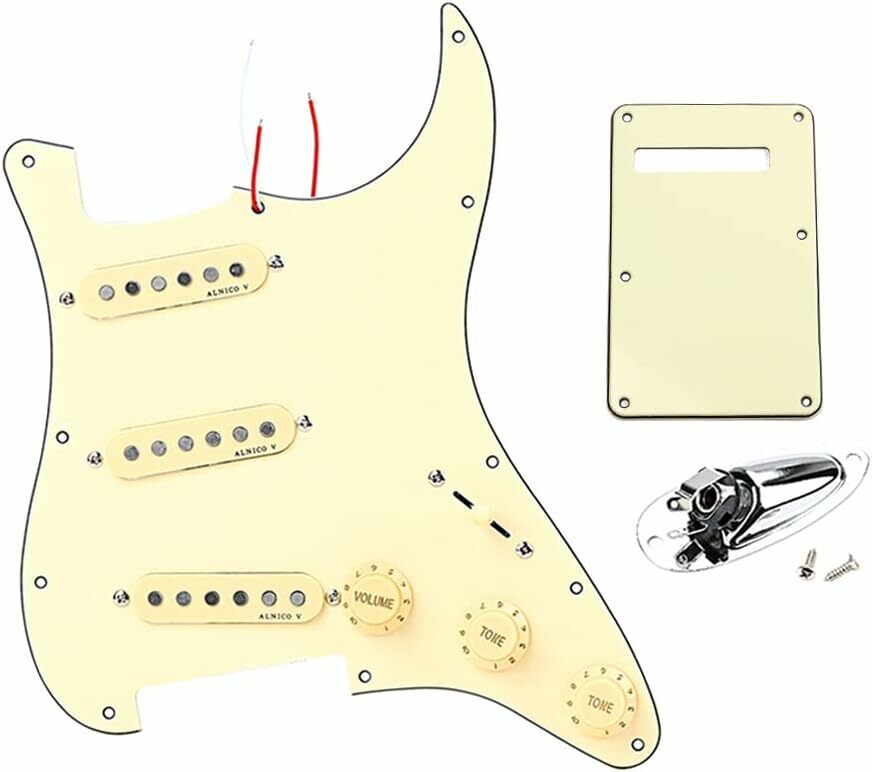
Ogdni Loaded Pickguard for Strat Electric Guitars
The Ogdni 3-Ply SSS Prewired Loaded Pickguard with Alnico V Pickups Kit for Strat Electric Guitars is a fantastic replacement part for any Stratocaster guitar. With its high-quality construction and smooth finish, it adds a touch of elegance to the instrument. The Alnico V pickups provide a rich and balanced tone, making it perfect for various genres of music. Additionally, the prewired kit saves time and effort during installation.
Overall, this pickguard kit from Ogdni is a great investment for anyone looking to upgrade their electric guitar. It not only enhances the aesthetics but also significantly improves the sound quality. Whether you’re a professional musician or just a hobbyist, this product is worth considering if you want to take your playing experience to the next level.
SSS pickups mean you do not have to buy a new pickguard for humbuckers
Loaded pickguard and pickups for easy installation
Comes prewired for easy installation
Comes with everything you need
Equivalent to loaded pickguard set
Aesthetic may not be to everyone’s liking
Some of the wires could be longer
Number of Pickup: 3
Material: 3Ply PVC
Resistance of Pickups: R:7.4KΩ, R:8.6KΩ, R:9KΩ
Surface: covered with film
Style: 11-Holes standard SSS strat
Size of input jack: 1/4 inch (6.35mm)
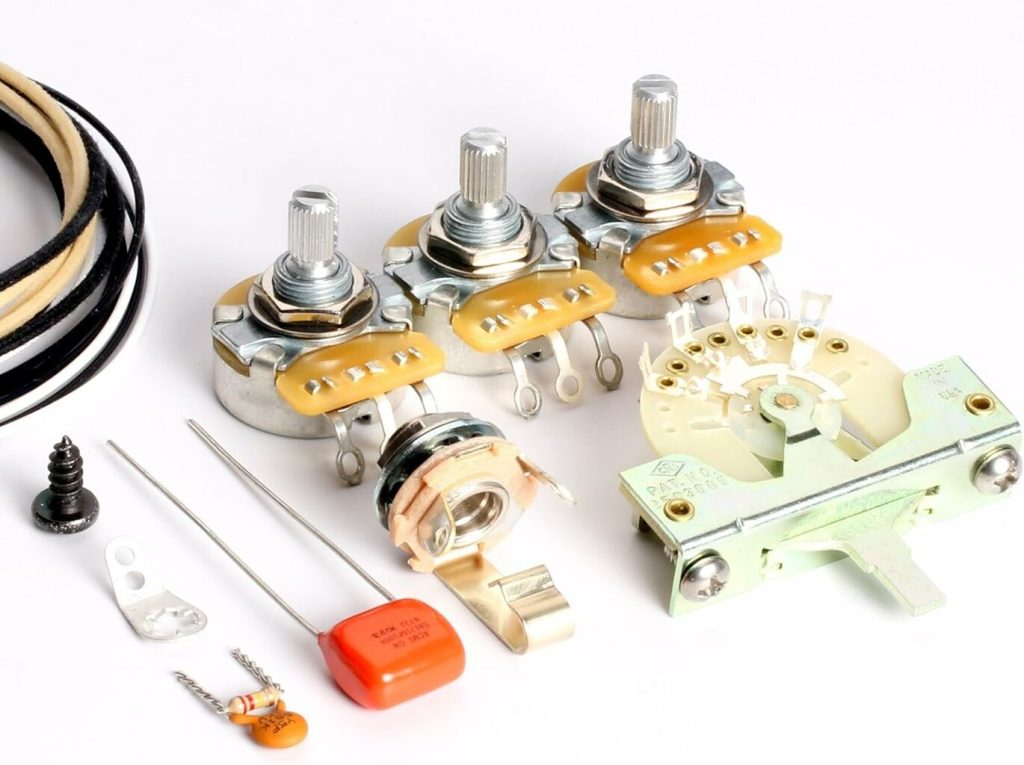
ToneShaper Wiring Kit for Fender Stratocaster
The ToneShaper Guitar Wiring Kit for Fender Stratocaster is a game-changer for any guitar enthusiast looking to upgrade their instrument. Specifically designed for SSS1 (Blender Wiring), this kit provides a wide range of tonal options that are simply unparalleled. The high-quality electronics included in the package ensure a crisp and clear sound, while the easily accessible push/pull switches allow for effortless coil splitting. The instructions provided are clear and concise, making the installation process a breeze. With the ToneShaper Guitar Wiring Kit, transforming your Stratocaster into a versatile and dynamic instrument has never been easier. It is a must-have for any serious musician.
Handy wiring diagram
Makes it easier to wire — especially if you have no experience doing so
Comes with every part you need
Comprehensive instructions
Comes with high-quality paper and foil capacitors
Requires some soldering experience
Can be complicated to install
Weight: 4.5 ounces
Gauge: 22.0
Style: Round
Size: 8.43 x 6.02 x 1.02 inches
Wire count: 1
Compatibility: Musical Instrument
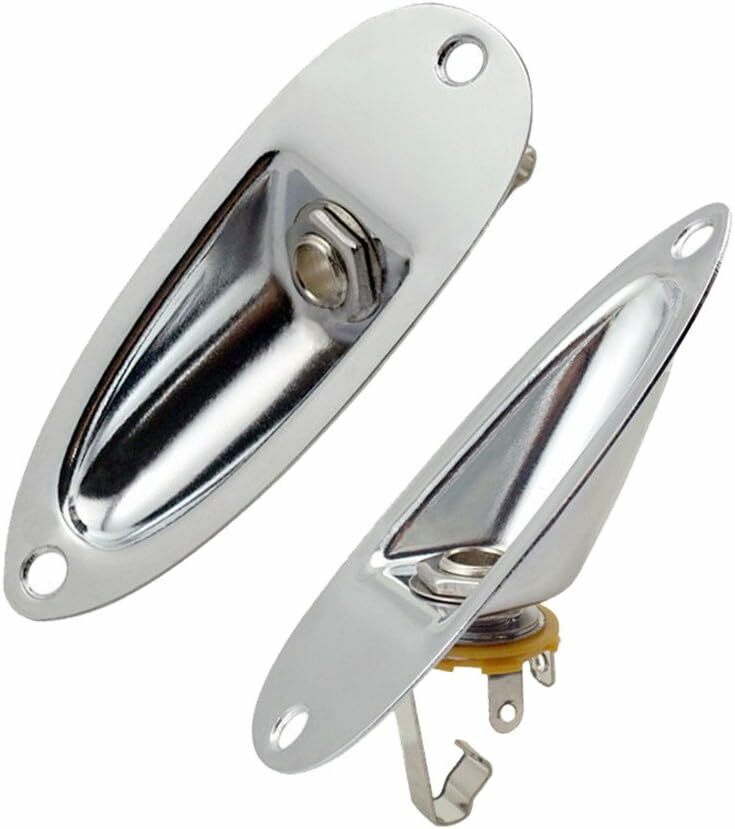
JD.Moon Loaded Guitar Pickup Plate
The 2pcs Boat Style 1/4″ Loaded Guitar Pickup Output Jack Plug Socket plate and Screws ferrule from JD.Moon Store are a fantastic addition to any Fender Strat Stratocaster Style Electric Guitar. The chrome finish gives it a sleek and polished look that complements the guitar perfectly. The boat style design adds a unique touch to the overall appearance.
In terms of functionality, these pickups deliver great sound quality with no interference or buzzing. The output jack plug socket is sturdy and secure, ensuring a reliable connection. The screws and ferrule provided are of high quality, making the installation process quick and hassle-free.
Overall, this product is a great value for the price. It not only enhances the appearance of the guitar but also improves its performance. Whether you’re a professional musician or just a hobbyist, these pickups are definitely worth considering for your Fender Stratocaster Style Electric Guitar.
Comes with 6.35mm output plugs and screws
Chrome or gold covers available
Comes with a 1/4-inch output jack and screws
Great for making a custom jack plate for Stratocaster
Includes output jack and mounting screws
May not fit all guitars
Will require a few modifications to fit most guitars
Design: Boat style
Material: Chrome
Mounting Screw hole center to center: 70mm
Output plugs size: 6.35mm
Number of items: 2 sockets
Guitar Suppliers: Where to Buy Guitar Parts
When it comes to sourcing guitar parts and materials, numerous reputable suppliers cater to builders of all skill levels. Here are a few trusted suppliers where you can find an extensive selection of guitar parts:
| Supplier | Description |
|---|---|
| Stewart MacDonald | Stewart MacDonald offers a wide range of guitar parts, tools, and accessories for luthiers and guitar enthusiasts. They have been a trusted supplier in the industry for over 50 years. |
| Seymour Duncan Pickups | Seymour Duncan Pickups specializes in high-quality pickups, pedals, and other guitar electronics. They are renowned for their innovative designs and exceptional tonal characteristics. |
| Guitar Parts USA | Guitar Parts USA is a one-stop-shop for guitar parts, offering everything from bodies and necks to hardware and electronics. They offer a wide selection of options to suit various styles and budgets. |
These suppliers, along with many others, provide a vast array of options to choose from, enabling you to find the perfect components for your guitar building project.
Now that you have an understanding of the necessary tools, parts, and suppliers, you’re ready to dive into the exciting world of guitar building. In the next section, we’ll explore the process of designing and planning your custom guitar.
Step 2: Design and Plan
Before you embark on building your own guitar, it is crucial to devote time to the design and planning phase. Developing a clear vision for your guitar will help guide the construction process and ensure a successful end result.
Consider Guitar Design Elements
One important aspect of guitar design is the scale length, which determines the length of the strings. Research various scale lengths to understand their impact on playability and sound. Additionally, explore different design concepts, whether you want to create a unique style or replicate an existing body shape.
Utilize Templates and Poster Boards
Using templates and poster boards can greatly assist in visualizing your guitar design. Templates provide precise outlines for the body, neck, and other components, enabling accurate measurements and consistent results. Poster boards allow you to sketch and experiment with different design elements before finalizing your concept.
Placement of Neck, Pickups, and Knobs
During the design phase, carefully consider the placement of the neck, pickups, and knobs. The positioning of these elements can greatly affect the playability and overall aesthetic of the guitar. Plan for comfortable access to the instrument’s various features while ensuring a balanced and visually appealing layout.
Incorporating these design considerations and meticulous planning into your guitar-building process will set the foundation for a successful and satisfying project.
Step 3: Routing the Body and Cavities
Now that your guitar design is finalized, it’s time to bring it to life by routing the body and cavities. This process involves using the appropriate routing tools to shape the body and create spaces for the pickups and electronics.
Routing is an essential step in crafting a guitar, as it determines the overall shape and contour of the instrument. By carefully carving and contouring the body, you can achieve a sleek and ergonomic design that enhances playability and comfort.
When routing the body, it’s important to take your time and exercise precision. Pay close attention to the depth and angles of your cuts to ensure a smooth and professional-looking outcome. Remember, the quality of your routing work will greatly impact the overall aesthetics and functionality of your guitar.
Additionally, when routing the cavities for the pickups and electronics, make sure to follow the dimensions and specifications provided by the manufacturer. This will ensure proper fitment and alignment of the components, allowing for optimal sound and performance.
To help you visualize the routing process, here’s a table outlining the necessary steps:
| Routing Process | Tools |
|---|---|
| Body Shaping | Plunge Router, Jigsaw, Belt Sander |
| Pickup and Electronics Cavities | Router Templates, Router Bits |
| Contouring | Spokeshaves, Rasps, Files, Sandpaper |
Remember, take your time and exercise caution as you route the body and cavities. By focusing on precision and attention to detail, you’ll create a guitar with a beautifully contoured body that enhances both its visual appeal and playing experience.
Step 4: The Neck
When building your own guitar, choosing the right wood for the neck is crucial. Popular options include maple, mahogany, and ash, each with its own unique characteristics. The choice of wood will impact the tone, stability, and overall feel of your instrument.
Once you’ve selected the perfect wood for your guitar neck, it’s time to shape and carve it to your desired profile. This process involves using rasps, files, and sandpaper to create a comfortable and ergonomic shape that fits your playing style.
Creating the Fretboard
Next, you’ll need to create a fretboard for your guitar neck. This is where the guitar frets are placed, allowing you to produce different notes and chords. Common materials for fretboards include walnut, maple, and rosewood.
Using the chosen material, carefully shape and smooth the fretboard surface. Pay attention to the fret slot depth and placement to ensure proper intonation and playability.
Installing a Truss Rod
To provide stability and adjust the neck relief, it’s essential to install a truss rod. This metal rod runs along the length of the neck and counters the tension exerted by the strings. Proper installation and adjustment of the truss rod are crucial to maintaining the ideal neck curvature.
Carving the Back of the Neck
The back of the neck plays a significant role in the overall comfort and playability of the guitar. Carefully carve the back of the neck, taking into consideration the contour that best suits your hand. Use rasps, files, and sandpaper to achieve a smooth finish.
The Neck Table
| Step | Description |
|---|---|
| 1 | Choose the wood for the neck, such as maple, mahogany, or ash. |
| 2 | Shape and carve the neck to your desired profile using rasps, files, and sandpaper. |
| 3 | Create the fretboard using the chosen material, like walnut or maple. |
| 4 | Install a truss rod for stability and adjustability. |
| 5 | Carve the back of the neck for a comfortable playing experience. |
Step 5: The Neck 1.0
Now that you have carved and shaped the neck, it’s time to install the truss rod and create the fretboard. These steps are crucial in ensuring the functionality and playability of your guitar.
Installing the Truss Rod
Begin by preparing the truss rod, which helps to stabilize the neck and counteract the tension of the strings. To install the truss rod:
- Using a router, create a channel on the back of the neck for the truss rod.
- Secure the truss rod in the channel using painters tape or clamps to hold it in place.
- Apply epoxy to the channel, ensuring full coverage, and let it dry according to the manufacturer’s instructions.
Remember to take your time and maintain precision during this process, as the truss rod is a crucial component for adjusting the neck’s relief and preventing bowing.
Creating the Fretboard
Next, it’s time to create the fretboard, which is where the frets are positioned. Follow these steps to make the fretboard:
- Carefully measure and mark the positions for the fret slots along the length of the neck.
- Using a fret saw, cut the slots into the fretboard, ensuring they are deep enough to hold the frets securely.
- Shape the top surface of the fretboard to the desired radius, ensuring a comfortable playing experience.
Take your time during this step to ensure the accuracy of the fret slots and the smoothness of the fretboard’s top surface. A well-made fretboard contributes to the overall playability and tone of the guitar.
Once you have completed these steps, your neck is starting to take shape. The truss rod provides stability, while the fretboard sets the foundation for the frets. Now, it’s time to move on to the next steps, where we’ll continue refining the neck and adding the final touches.
Step 6: Neck 1.01 Making a Fretboard
Once you have carved and shaped the neck of your guitar, it’s time to make the fretboard. The fretboard is an essential component that determines the playability and tone of your instrument. To create a high-quality fretboard, you need to carefully consider the choice of material, thickness, and radius.
Choosing the Right Guitar Fingerboard Material
The guitar fingerboard material plays a crucial role in the overall sound and feel of your instrument. The two most commonly used materials for fretboards are maple and rosewood.
- Maple: Maple fretboards are known for their bright and snappy tone. They offer excellent note definition and sustain, making them ideal for genres like rock and country.
- Rosewood: Rosewood fretboards have a warmer and more mellow tone. They produce rich harmonics and are often favored by players who prefer blues, jazz, or fingerstyle playing.
Controlling the Guitar Fretboard Thickness
The thickness of the fretboard affects the overall playability and stability of your guitar. It’s essential to choose an appropriate thickness that suits your playing style and preferences.
The standard fretboard thickness for most guitars is around 0.25 inches (6.35 mm). However, some players prefer thinner or thicker fretboards based on their playing technique and comfort.
Creating the Guitar Fretboard Radius
The fretboard radius refers to the curvature of the fretboard’s top surface. It determines the ease of playing chords, bending strings, and overall comfort.
A smaller radius, such as 7.25 inches (184 mm), offers a more pronounced curvature and is well-suited for playing lead guitar and bending strings. On the other hand, a larger radius, like 12 inches (305 mm), provides a flatter surface and is often favored by rhythm guitarists and players who prefer lower action.
When creating the fretboard radius, precision is key. You can use a table saw equipped with a radius jig to achieve the desired curvature. Ensure you take the necessary safety precautions and work slowly and carefully to achieve a smooth and properly leveled fretboard.
Having chosen the right material, determined the appropriate thickness, and created the desired radius, you are now ready to move on to the next step of guitar building.
Step 7: Neck, 1.02 Carving the Back
Now that you have shaped the front of the guitar neck, it’s time to focus on carving the back. This step is crucial for achieving a comfortable and playable neck shape. Using rasps, files, spoke shaves, and sandpaper, carefully carve the back of the neck to your desired shape. Take your time and regularly evaluate the feel of the neck in your hand to ensure it fits comfortably and supports your playing style.
Make sure to maintain a consistent and smooth contour from the base of the neck to the heel. This will provide a comfortable grip and allow for fluid movement along the guitar neck. Pay attention to any sharp edges or rough spots and refine them using progressively finer grits of sandpaper.
Remember, the goal is to create a neck shape that feels natural and ergonomic for your playing preferences. Take the time you need to achieve the desired results, as the neck shape plays a significant role in the overall playability and comfort of your custom-built guitar.
Step 8: Neck, 1.03, Fret Markers
Once your guitar neck is shaped and ready, it’s time to add the finishing touches – fret markers. These markers serve as visual guides for players, helping them navigate the fretboard with ease.
There are various techniques you can utilize to create unique and visually appealing fret markers. One popular method is through inlay techniques, where intricate designs are crafted and inserted into the fretboard. This can be done using materials like mother of pearl, abalone shell, or wood veneer. You can draw inspiration from other inlay projects to create your own custom designs.
Alternatively, you can opt for simpler fret markers such as dots. These can be made using materials like plastic or pearl, and they are easy to install.
Whether you choose intricate inlays or simple dots, fret markers add both aesthetic appeal and functional value to your guitar. They enhance the overall look of the fretboard while making it easier for you to locate specific frets during playing.

| Pros | Cons |
|---|---|
| Can create unique designs for a personalized touch | Requires precision and skill in inlaying materials |
| Adds visual appeal to the fretboard | More time-consuming compared to simple dot markers |
| Aids in navigation and positioning on the fretboard | May increase overall cost of guitar construction |
Step 9: Neck, 1.04. Truss Rod Cover
Adding a truss rod cover is a simple yet impactful way to personalize your guitar and provide easy access to the truss rod. You can either create your own truss rod cover using materials like lacewood or purchase one that fits your style and preferences. Ensure that the truss rod cover is sized and shaped to fit the truss rod access on your guitar’s neck.
Here are some steps to guide you in creating or installing a truss rod cover:
- Measure the truss rod access: Take precise measurements of the width and length of the truss rod access on your guitar’s neck. This will help you determine the size of the truss rod cover you need.
- Select the material: Choose a suitable material for your truss rod cover, such as lacewood, to match the aesthetic of your guitar. Alternatively, explore different options available in the market that complement your style.
- Shape the truss rod cover: If creating your own truss rod cover, use a template or outline the measurements onto the chosen material. Carefully cut and shape the cover to match the dimensions of the truss rod access.
- Smooth and finish: Ensure the edges of the truss rod cover are smooth and free from any sharp edges or rough surfaces. Use sandpaper to achieve a polished finish.
- Install the truss rod cover: Place the truss rod cover over the truss rod access and secure it in place using adhesive, screws, or other suitable fastening methods. Ensure a snug fit and proper alignment.
Adding a truss rod cover not only enhances the visual appeal of your guitar but also provides easy access to adjust the truss rod when necessary. It’s a small detail that can make a big difference in the overall look and functionality of your instrument.
Step 10: Neck 1.05. Fretboard Finishing and Fretting
Once you have shaped and carved the neck to perfection, it’s time to finish the fretboard and install the fret wire. This step is crucial for ensuring optimal playability and performance of your custom-built guitar.
To start, apply a conditioning product to the fretboard to enhance its durability and protect it from moisture. This will also give the wood a smooth and polished appearance. Consider using a conditioning oil or wax that is specifically designed for guitar fretboards.
When it comes to installing the fret wire, precision is key. Ensure that each fret wire is properly aligned and seated securely in the fret slots. Pay attention to the height of the frets, as this will greatly impact the playability of the instrument. Use a fret leveling tool to ensure that each fret is at the desired height, resulting in consistent and even action across the fretboard.
Here is a step-by-step guide to finishing the fretboard and installing the fret wire:
- Clean the fret slots using a fret saw blade or specialized cleaning tool.
- Pre-bend the fret wire to match the radius of the fretboard.
- Apply a small amount of cyanoacrylate adhesive (super glue) to the fret slots.
- Press the fret wire firmly into the slots, ensuring proper alignment.
- Trim off any excess fret wire using a fret cutter.
- File down the sharp ends of the fret wire to prevent any discomfort during play.
- Use a fret leveling tool to ensure all frets are at the desired height.
- Use a fret crowning file to round the tops of the frets, creating a smooth playing surface.
- Polish the frets using fine-grit sandpaper or specialized fret polishing pads.
It is important to pay attention to every detail during fretboard finishing and fretting to achieve a professional result. Take your time, use the right tools, and maintain precision throughout the process.
For a visual reference, here is an image of a perfectly finished and fretted guitar fretboard:
Step 11: Neck, 1.06, the Final Touches
As you approach the final stages of building your own guitar, it’s time to focus on the neck and give it the finishing touches that will enhance both its appearance and functionality. This step involves two crucial aspects: installing the tuners on the headstock and applying a suitable finish coat to the neck for added protection and durability.
Installing the Tuners
Proper installation of the tuners is essential to ensure accurate and smooth tuning of your guitar. Start by carefully marking the desired positions for the tuners on the headstock, making sure they are evenly spaced and aligned. Use a drill with a bit appropriate for the tuner’s shaft diameter to create pilot holes for the screws. Then, attach the tuners firmly to the headstock by screwing them into place.
Next, place the guitar strings into their respective tuner pegs. Begin with the low E string and thread it through the hole in the tuner peg. Pull the string until it’s tight, then wind it around the peg in a clockwise direction, making sure each subsequent winding goes below the previous one. Repeat this process for all the strings, ensuring proper tension and neat winding.
Neck Finishing
To protect the neck and enhance its visual appeal, it’s important to apply a suitable finish coat. One popular option is wipe-on poly, which provides a smooth and durable finish. Begin by sanding the neck with fine-grit sandpaper to create a smooth surface. Remove any dust or debris from the neck with a clean cloth.
Using a lint-free cloth or applicator pad, apply a thin, even coat of wipe-on poly to the neck. Allow the first coat to dry according to the manufacturer’s instructions, typically a few hours. Lightly sand the neck with fine-grit sandpaper between coats to ensure a smooth finish. Repeat the application and sanding process until you achieve the desired level of gloss and protection.
Once the final coat has dried completely, inspect the neck for any imperfections or uneven areas. Lightly sand or touch up any blemishes to ensure a flawless finish. Take this opportunity to assess the overall aesthetics of the neck and make any necessary adjustments to ensure it aligns with your vision.
In the image above, you can see an example of a beautifully finished guitar neck, demonstrating the attention to detail and craftsmanship that can elevate your DIY guitar building project.
Overview of Neck Finishing Materials
| Finish Coat | Description |
|---|---|
| Wipe-on Poly | A durable and easy-to-apply finish that provides a smooth and glossy surface. |
| Nitrocellulose Lacquer | A traditional finish known for its excellent clarity and vintage appeal. |
| Tung Oil | A natural finish that enhances the wood grain while providing moderate protection. |
| Tru-Oil | A gunstock oil finish that offers a warm and attractive appearance for guitar necks. |
Choosing the right finish coat for your guitar neck is a matter of personal preference. Consider factors such as durability, ease of application, and the desired aesthetic to select the best option for your DIY guitar project.
Step 12: Body Work
Now that you have completed the neck, it’s time to focus on the guitar body. This step is crucial in achieving a polished and professional look for your instrument. Follow these steps to prepare and work on the body:
- Guitar Body Filling: Begin by filling any imperfections on the body using wood filler. This will help create a smooth and even surface for painting. Make sure to sand between each layer of filler for the best results.
- Guitar Body Priming: Next, apply a high-build automotive primer to the body. This primer will help create a strong foundation for the paint and ensure a durable finish.
- Guitar Body Painting: After priming, it’s time to consider the color coat. Choose a suitable paint or finish that matches your desired look for the guitar. Whether you opt for a classic solid color or an intricate design, make sure to apply the paint evenly and with precision.

This image showcases the process of painting the guitar body, creating a stunning visual appeal and adding a personal touch to your instrument. Remember to take your time and pay attention to detail to achieve a flawless finish.
Step 13: Top Coating the Body
Once you have finished all the necessary preparations on your guitar body, it’s time to apply the top coating. This step will give your guitar body its final appearance, protection, and durability. You have the option to either take your guitar body to a professional automotive body shop or complete the top coating process on your own.
If you choose to do it yourself, one popular method is to use car paint and clear coat for a professional finish. Start by applying the color coat according to your desired aesthetic. Once the color coat is dry, apply a clear coat to protect the body and give it a glossy appearance.
A popular choice for clear coat is nitrocellulose lacquer, which provides a vintage-looking finish. It’s important to follow proper safety precautions when working with nitrocellulose lacquer, such as wearing a mask and working in a well-ventilated area.
After applying the clear coat, you can further enhance the finish by buffing and polishing the body. This will give your guitar a smooth and glossy surface. Consider using carnauba wax for the final touch, which will provide added protection and luster.
Remember to take your time and work in a clean and controlled environment to achieve the best results for your guitar body finishing.
For a visual reference, here is an example of the guitar top coating process:
Step 14: Shielding
One common issue that guitar players often encounter is unwanted electronic interference and a humming sound coming from their instrument. To tackle this problem, it is essential to shield the electronic cavities of the guitar. By doing so, you can effectively reduce 60-hertz hum and minimize external interference, resulting in a cleaner and more focused sound.
The process of shielding involves the application of a protective coating to the cavities of the guitar. One popular material used for shielding is copper leaf paint. This conductive paint helps create a barrier against electromagnetic interference, preventing it from affecting the guitar’s pickups and electronics.
To shield your guitar, follow these steps:
- Start by detaching all the electronics from the guitar body, including the pickups, switches, and potentiometers.
- Clean the inside of the cavities to remove any dirt, dust, or debris that may interfere with the shielding process.
- Apply the copper leaf paint or other suitable shielding material to the inside walls of the cavities, ensuring complete coverage.
- Allow the paint to dry according to the manufacturer’s instructions before reinstalling the electronics.
- Once everything is dry, reassemble the guitar, making sure that all the components are properly connected and secured.
By shielding the electronic cavities of your guitar, you can significantly reduce unwanted hum and interference, resulting in a cleaner and more professional sound quality.
Pros and Cons of Guitar Shielding Methods
| Shielding Method | Pros | Cons |
|---|---|---|
| Copper Leaf Paint |
|
|
| Copper Tape |
|
|
| Aluminum Foil |
|
|
Step 15: Neck Meets Body
Now that you have completed the various steps involved in constructing the neck and body of your guitar, it’s time to bring them together. The attachment of the neck to the body is a crucial step that ensures the stability and playability of your instrument. Follow these guidelines to achieve a secure and reliable connection:
1. Gather the necessary materials:
- Guitar neck
- Guitar body
- Screws
- Stainless steel finish washers
2. Position the neck:
Place the neck in the neck pocket of the guitar body, ensuring proper alignment and fit. Pay close attention to the neck angle and the position of the fretboard in relation to the body.
3. Insert the screws:
Using an appropriate screwdriver, carefully insert the screws through the holes in the neck plate or neck heel and into the body. Make sure to place stainless steel finish washers between the screw heads and the body to distribute the pressure evenly and protect the wood.
4. Tighten the screws:
Gently tighten the screws until they are snug, but be careful not to overtighten, as this can damage the wood or strip the screw holes. Ensure that the neck is securely attached to the body, with no wobbling or movement.
5. Check alignment:
Verify that the neck is properly centered and aligned with the body. Use a straightedge or ruler to check for any irregularities or misalignment along the neck and body joint.
6. Test stability:
Gently yet firmly hold the guitar by the neck and body to test the stability of the attachment. Wiggle the neck to ensure there is no movement or play between the neck and body joint. A solid and secure connection is essential for optimal playability.
By following these steps, you will successfully attach the neck to the body of your guitar. This crucial step sets the foundation for the final assembly of your instrument. Next, we will move on to installing the electronics, bringing your guitar one step closer to completion.
Step 16: Installing the Electronics
Now that the guitar body and neck are coming together, it’s time to focus on installing the electronics. Proper wiring is essential to ensure that your guitar produces clear, balanced sound. In this step, we will guide you through the wiring process, including the installation of pickups, potentiometers, switches, and the input jack.
To start, refer to the chosen wiring diagram for your guitar. This diagram acts as a blueprint, guiding the connection of various components. It ensures that the signal flow is correct and minimizes the risk of interference or unwanted noise.
Note: If you’re unsure about reading and understanding wiring diagrams, consider seeking professional assistance or consulting online resources that provide tutorials and explanations. It’s important to have a clear understanding before proceeding.
Create a clear workspace with ample lighting and gather the necessary tools and supplies, including soldering iron, solder, wire cutters, and wire strippers. Organize your components and label them if necessary for easy identification.
1. Connecting Pickups
Begin by connecting the guitar pickups according to the wiring diagram. Each pickup has two or more wires, typically color-coded to indicate their function. Strip the appropriate amount of insulation from each wire, as indicated by the diagram, and solder them onto the designated points on the volume or tone potentiometers.
2. Installing Potentiometers
Mount the potentiometers (also known as pots) in the control cavity of the guitar body. Ensure they are securely fastened and positioned correctly. Connect the remaining wires from the pickups to the appropriate terminals on the pots, following the wiring diagram.
3. Wiring Switches
If your guitar has multiple switches for pickup selection or other functions, wire them according to the diagram. Connect the necessary wires from the pickups and pots to the appropriate terminals on the switches. Take care to route and secure the wires neatly to avoid any potential tangling or interference.
4. Installing the Input Jack
Position the input jack in its designated location on the guitar body. Solder the ground wire to the back of the potentiometer or a designated grounding point, as specified in the wiring diagram. Then, solder the hot wire to the appropriate terminal on the input jack.
Once all the connections are complete, carefully test the circuit by plugging in your guitar and playing through an amplifier. Monitor for any unwanted noise or issues with volume or tone control. Make any necessary adjustments and ensure that all the connections are secure.
Remember, proper insulation of exposed wires is crucial to prevent short circuits and damage. Use heat shrink tubing or electrical tape to cover any exposed solder joints or bare wires.
Note: If you’re not comfortable or experienced with guitar electronics wiring, it’s advisable to seek the assistance of a professional guitar technician or luthier.
Table
| Component | Tool Required |
|---|---|
| Pickups | Soldering Iron, Solder, Wire Strippers, Wire Cutters |
| Potentiometers | Soldering Iron, Solder, Screwdriver |
| Switches | Soldering Iron, Solder, Screwdriver |
| Input Jack | Soldering Iron, Solder, Screwdriver |
| Heat Shrink Tubing or Electrical Tape | Heat Gun or Scissors |
Step 17: Adding the Bridge
Now that your guitar body is taking shape, it’s time to install the bridge. The bridge plays a crucial role in maintaining proper string tension, intonation, and action, ensuring optimal playability. Follow these steps to successfully add the bridge to your guitar:
- Prepare the guitar body: Ensure that the body is clean and free from any debris or dust. This will provide a solid and stable surface for the bridge installation.
- Choose the right bridge: Select a bridge that matches the design, style, and scale length of your guitar. There are various types of bridges available, such as fixed bridges, tremolo bridges, and vintage-style bridges. Consider the sound and functionality you desire for your guitar.
- Positioning and alignment: Determine the appropriate position for the bridge on the guitar body. The bridge should be aligned parallel to the fretboard and centered between the neck and tail of the guitar. Use a ruler or measuring tape to ensure accurate placement.
- Mark the bridge location: Once you have determined the ideal position for the bridge, use a pencil or masking tape to mark the exact location on the guitar body. This will serve as a guide during the installation process.
- Drilling pilot holes: Use a drill and the appropriate size drill bit to create pilot holes for the bridge screws. These pilot holes will prevent the wood from splitting when attaching the bridge. Take care to drill straight and avoid drilling too deep.
- Attaching the bridge: Place the bridge on the marked location and align it with the pilot holes. Use screws or other mounting hardware provided with the bridge to secure it to the guitar body. Tighten the screws firmly but avoid over-tightening to prevent damage to the wood.
- Adjustments for intonation: Once the bridge is securely attached, you may need to make adjustments for intonation. Intonation refers to the accuracy of each string’s pitch when played at different fret positions. Use a guitar tuner to check the intonation and make necessary adjustments by moving the bridge saddles forward or backward.
By following these steps, you can successfully install the bridge on your guitar body, ensuring proper spacing, alignment, and playability. Take your time during this process to achieve the best possible results.
| Bridge Type | Description |
|————————|————————|
| Fixed Bridges | These bridges are stable and provide consistent string tension. They are commonly found on solid-body electric guitars and some acoustic guitars. |
| Tremolo Bridges | Also known as whammy bars or vibrato systems, tremolo bridges allow players to change the pitch of the strings by altering the tension. Popular examples include Floyd Rose and vintage-style tremolo bridges. |
| Vintage-Style Bridges | These bridges replicate the designs found on classic guitars, such as the Stratocaster or Telecaster. They offer vintage aesthetics and tonal characteristics. |
Understanding the different types of guitar bridges can help you choose the right one for your instrument and musical style.
Step 18: Some Times You Feel Like a Nut
One crucial component of your guitar that can greatly affect its playability and tone is the nut. It is a small piece made from various materials, such as bone, synthetic bone, brass, or graphite. The choice of guitar nut material depends on factors like personal preference and budget. Let’s explore the process of shaping and installing the guitar nut for optimal performance.
Shaping the Guitar Nut
The first step in shaping the guitar nut is selecting the appropriate material. Bone is a popular choice due to its durability and excellent tonal characteristics. To shape the nut, carefully measure and mark the correct dimensions based on your guitar’s scale length and string spacing. Use a nut file set or sandpaper to gradually shape the nut, ensuring a smooth and precise fit for the strings. Pay attention to the height of the nut to avoid any buzzing or intonation issues.
Installing the Guitar Nut
Once the nut is shaped, it’s time to install it on your guitar. Begin by gently removing the old nut, if necessary, using a small chisel or nut removal tool. Clean the nut slot thoroughly to ensure a snug fit for the new nut. Apply a small amount of wood glue or epoxy to the bottom of the nut, then carefully position it in the nut slot, ensuring proper alignment and orientation. Apply gentle pressure to secure the nut in place and wipe off any excess glue. Allow sufficient drying time before stringing the guitar.
By shaping and installing the guitar nut correctly, you will have a crucial element that contributes to optimal string action, intonation, and overall playability. Take your time and ensure precision in this step to achieve the best results.
| Pros of Bone Nuts | Cons of Bone Nuts |
|---|---|
| Better sustain and tonal quality | Requires more precise shaping |
| Enhanced string vibration transfer | More expensive than synthetic options |
| Increase in overall resonance | May be more prone to cracking |
| Durable and long-lasting | Not suitable for those with bone allergies |
Conclusion
Congratulations on successfully building your own guitar from scratch! By following this comprehensive DIY guide, you have acquired the knowledge and skills necessary to create a unique custom instrument that perfectly suits your style and preferences. Building your own guitar is not only a rewarding experience but also allows you to have full control over the design, materials, and sound of your instrument.
Throughout this step-by-step guitar building journey, you have learned various techniques such as routing the body, shaping the neck, installing electronics, and applying the perfect finish to create a masterpiece. It’s a testament to your dedication and passion for music.
Now that your DIY guitar is complete, it’s time to enjoy the results of your hard work. Take pride in playing and showcasing your handmade instrument to friends, family, and audiences. Whether you’re a seasoned builder or a beginner, this guitar building experience has showcased your DIY guitar success!
FAQ
What tools and parts do I need to build my own guitar?
To build your own guitar, you will need tools like a plunge router, drill, jigsaw, belt sander, and soldering iron. You will also need guitar parts such as a premade neck, body blank, bridge, tuners, pickups, and electronics. These tools and parts can be purchased from suppliers like Stewart MacDonald, Seymour Duncan Pickups, and Guitar Parts USA.
How do I design and plan my guitar?
When designing and planning your guitar, consider factors like scale length and body shape. Research different design concepts and use templates and poster boards to sketch and visualize your design. Pay attention to the placement of the neck, pickups, and knobs in your design.
How do I route the body and cavities of the guitar?
To route the body and cavities of the guitar, use the appropriate routing tools to shape the body and create cavities for the pickups and electronics. Take your time with the carving and contouring process to ensure a smooth and ergonomic body shape.
How do I shape and carve the neck of the guitar?
To shape and carve the neck of the guitar, choose a wood like maple, mahogany, or ash. Use rasps, files, and sandpaper to shape the neck to your desired profile. Create a fretboard using materials like walnut or maple. Install a truss rod for stability and take care in carving the back of the neck for a comfortable playing experience.
How do I install the truss rod and create a fretboard?
Install the truss rod in the neck using a router, painters tape, and epoxy. Create the fretboard by cutting slots and shaping the top surface to the desired radius. Take your time and ensure precision in these steps to achieve a well-functioning and visually appealing neck.
How do I carve the back of the guitar neck?
Carve the back of the guitar neck to the desired shape using rasps, files, spoke shaves, and sandpaper. Take your time and regularly evaluate the feel of the neck in your hand to achieve a comfortable and playable shape.
How do I add fret markers to the fretboard?
To add fret markers to the fretboard, you can use intricate inlays or simple dots. Take inspiration and techniques from other inlay projects to create unique and visually appealing fret markers.
How do I create a truss rod cover for the neck?
You can create a truss rod cover for the neck using materials like Lacewood or purchase one. Take care in sizing and shaping the cover to fit the truss rod access, adding a personalized touch to your guitar.
How do I finish the fretboard and install the frets?
Finish the fretboard by applying a suitable conditioning product and install the fret wire. Take care to ensure the proper height and alignment of the frets, and consider using a maple fretboard for varnishing and other wood types for waxing.
How do I install the tuners and finish the neck?
Install the tuners on the headstock, taking care in spacing and alignment. Apply a suitable finish coat to the neck, such as wipe-on poly, for added durability and protection. Consider the final aesthetics of the neck and make any necessary adjustments before moving on to the next steps.
How do I prepare and paint the guitar body?
Prepare the guitar body by filling any imperfections with wood filler, sanding between each layer for a smooth surface. Apply a high-build automotive primer and follow with glazing and spot putty. Consider the color coat and choose a suitable paint or finish for your desired look.
How do I top coat the guitar body?
Apply the color coat to the guitar body, either through a professional automotive body shop or on your own. Consider using car paint and clear coat, followed by a nitrocellulose lacquer and Canuba wax for added protection and a polished finish.
How do I shield the electronic cavities of the guitar?
Shield the electronic cavities of the guitar using copper leaf paint or other suitable materials to reduce 60-hertz hum and interference. Apply the protective coating carefully to ensure proper coverage and effectiveness.
How do I attach the neck to the body of the guitar?
Attach the neck to the body using screws and stainless steel finish washers. Ensure a secure and stable connection between the neck and body, taking care in alignment and spacing.
How do I install the electronics in the guitar?
Wire the guitar’s electronics according to the chosen wiring diagram, connecting the pickups, potentiometers, switches, and input jack. Take care in routing and securing the wires to ensure proper functionality and avoid interference.
How do I add the bridge to the guitar body?
Install the bridge on the guitar body, ensuring proper spacing and alignment with the neck and pickups. Consider any necessary adjustments for intonation and action to achieve optimal playability.
How do I shape and install the guitar nut?
Shape and install the guitar nut using materials like bone or other suitable options. Take care in sizing and spacing the nut for proper string height and spacing, ensuring optimal performance.
Source Links
- https://www.instructables.com/Build-Your-Own-Electric-Guitar!/
- https://www.instructables.com/How-to-build-an-Electric-Guitar/
- https://guitarkitworld.com/blogs/manual
This post may contain affiliate links. As an Amazon associate, Google associate as well as associate for other programs, Guitar & Music Institute may earn commissions from qualifying purchases.


